This guide will provide you with information on how to create an interstitial campaign. An interstitial is an advertisement that appears between the pages of a publication.
|
NB!
|
When you access the Interstitials feature you will see a new screen with an overview of your interstitials campaigns as shown below.
By pressing the “CREATE NEW CAMPAIGN” button, you will start the process of creating your new campaign.
Plan campaign
The first step in creating your new interstitials campaign allows you to choose a name and the active period for your campaign as shown below:
After entering the campaign name and the period of time of which you would like your campaign to be active, press NEXT to continue.
Campaign properties
On the “Campaign properties” screen you will be able to choose between a variety of options:
Platform
This option will allow you to choose all or between the different platforms on which your interstitial campaign should run.
Mobile device type
This option will allow you to choose which mobile device type (mobile/tablet) you would like your interstitials campaign to run on or if it should run on all the device types.
Location
This option is divided into two choices, Frequency and Page Numbers:
Frequency is a global setting, which allows you to choose how many swipes between pages your interstitials should be displayed to the reader. In the options panel on the interstitials overview page, it is possible to set frequency. The chosen frequency is displayed on the Campaign Properties page as seen below. Please be aware that changing the frequency will affect all active campaigns.
Page Numbers allows you to target certain pages of your publication. Entering the number 3, will display your interstitial after page 3. Comma separate more page numbers to place the interstitial after more pages. Only odd numbers are allowed.
Choose titles
If you administrate more than one title, you can book the same interstitial to several titles. Press the drop down arrow under the Tiles headline and select in which titles you wish to book your interstitial campaign. All available titles are preselected, so if you want to target specific titles, you must make sure that the desired titles are checked.
Choose publication date
This option will allow you to choose in which publications you would like your interstitials campaign to run. You have the option of choosing all the dates on which the campaign is set to run or you can be choosing specific dates, depending on your preferences. So if you like your interstitial to run three Sundays in a row, you just pick the dates of the next three Sundays.
After choosing your preferences, press “NEXT” to continue.
Upload media
You now have the option to add the images which will serve as your interstitials.
Requirements
Recommendations
We strongly recommend that you, as a minimum, upload your interstitial in a landscape version as well as in a portrait version in the following sizes:
Landscape: W1024 pixels X H768 pixels
Portrait: W768 pixels X H1024 pixels
Interstitials will be scaled on the device without changing ratio of the picture. If you only upload one interstitial, this will be shown in both orientations.
You can upload additional larger and smaller interstitials to target different devices, for instance iPad Pro’s, devices with retina displays or phones where the screen size does not allow for too compact information. The best suited interstitial will automatically be chosen by the device. If you book an interstitial for Desktop only, a size of W2048 pixels X H1496 pixels is recommended.
However, if you only upload images larger than 1024x768 they will NOT scale down and be shown on phones.
Please make sure that there are no empty spaces or special characters in the images files that you upload.
In the “Upload Media” screen you can insert a link for the landing page the user will open, when clicking the interstitial. By pressing the “ADD MEDIA” button in the bottom right corner of your screen, you can upload the pictures you wish to book for the campaign.
Please note: The URL must not contain special characters like # & æ ø å. URLs should be encoded or converted to shortened URLs by using free services like bitly.com.
If you don't succeed in uploading files but get the message "Upload failed: An error occurred" it might be because of Adblocker. Try disabling it and give it another try.
Once you have finished providing the files desired as your interstitials, press “NEXT” to continue.
Confirm
The last part of your interstitials setup will provide you with an overview of the options you have chosen for your campaign as shown below.
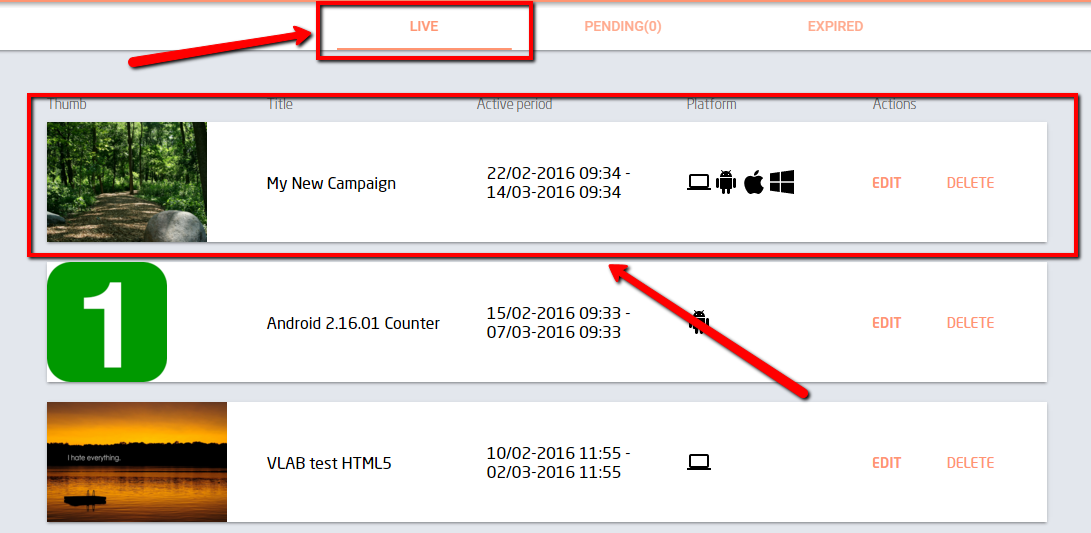
Press save to create your interstitials campaign. Once the campaign has been saved it will be displayed under the “LIVE” tab as shown below.
If your campaign is planned to start at a future date, it will be displayed under the “PENDING” tab as shown in the picture below.
Once the live period of your campaign is over, it will possible to observe the campaign under the “EXPIRED” tab as shown below.
Comments